
Oh, yeah, good things are still happening, and we're still making progress. It just hasn't been going entirely as smoothly as I'd hoped.
On the plus side, I've been working two evenings a week on the control stick mechanism platform, the winglet transitions, and the steel trusses that will support the wing mold shells. All that stuff is moving along pretty smoothly.
For the winglet transitions, I'm using the same "Stack o' Ribs" buildup technique that we applied for the default wingtips, the horizontal stabilizer tips, and the wing-to-fuselage junction fillet. However, the requirement for the winglet transition to bend up smoothly through about 87 degrees makes it a bit awkward to use slices all in one plane. So this time I'm trying a technique that uses slices in two different planes, and "braids" the slices together in the intersection zone. Brad Hill did all the hard work of this by taking his existing 3D model of the winglet transition and slicing it along the required planes and then imposing the braid based on my rough sketches.
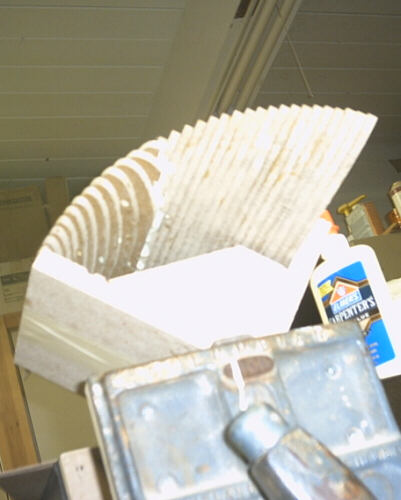
Another experiment I'm going to try with the winglet transition is a half-sand, half-build approach to the surface contour. Instead of arranging the slices so that the finish contour is achieved when all of the discrete tiers are sanded away, we've arranged them so that the contour is achieved when the tiers are sanded away to half their thickness. That leaves a series of trenches in the part when the target contour is reached. My plan is to sand to that contour and then fill the trenches with Bondo.
Also, this time the slices are 1/4" double-tempered Masonite, and not PVC or urethane foam like we've used in previous slice-up parts. I think that the Masonite will have about the same hardness as the Bondo in the trenches. Also, it was cheap and convenient and easy to bandsaw to contour and drill for the stacking pegs of 1/4" wooden dowel.
The control stick platform harks back to a design I did about 10 years ago for a retrofit control stick system for the HP-18. It is basically a knee hump with a transverse trench in which the control stick mechanism mounts. I converted one HP-18 fuselage to this sort of design, but when I went back and did a simplification of the design to make it easier to field-install I replaced the composite trench with a steel weldment that mounts to phenolic pads bonded and screwed to the fuselage shell.
For the wing mold structure, what I've designed is a fully-triangulated steel tube space frame based on two 16" deep trusses, one each along the leading and trailing edges of the mold shell. The longerons are 1" square steel tubing of 1/16" wall, and the verticals and diagonals are 3/4" square steel tubes of the same thickness. I'll be mass-producing the 24-foot trusses on a 12-foot long jig, welding together first one end of the truss, then flipping it around and welding the remaining 12 feet. Each truss has six 47" bays, and each bay is triangulated with a diagonal. That structure yields wing molds that have a great degree of strength and stiffness in both bending and (very importantly) in torsion.
Also, in the outboard area of the wing mold, the diagonals of the trusses along the trailing edge of the mold shells will have jackscrew features that will let me adjust their length slightly. That will let me make minor adjustments to the washout so that I can tweak the molds into the specified incidence, and perhaps adjust the incidence slightly after testing the first article wings.
So far on the wing mold support frame I'm several layers deferred from actual parts. Right now (let me think about this and get it straight) I've made jigs to make parts to make jigs to make parts that support molds that make parts to make sailplane wings. Whew!
What I've done so far is to weld together some basic tools, and used those tools to weld together little cleats that will become parts of the jigs that I'll use to make the eight trusses that will support the four wing mold shells. I've also made the 12' x 2' wooden jig platform that the cleats will be screwed down to. Over the next shop session or so I'll align and mount the cleats on the platform, and then start welding up the trusses.
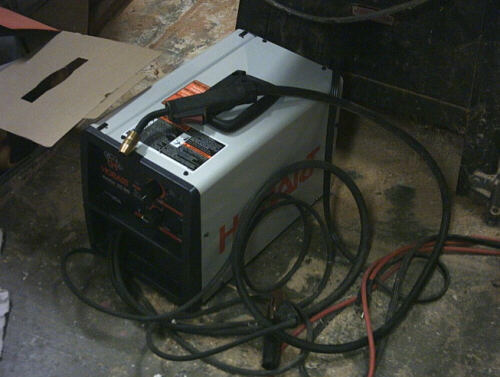
Oh, right - in support of all this welding activity I've gone out and bought a neat little MIG welder; after shopping the discount houses like Harbor Fright I bit the bullet and ordered a Hobart Handler 125. I originally ordered the non-gas version of this machine, intending to do gasless MIG (yes, I know, that's a contradiction) welding using flux-core wire. However, my friend Steve Smith kicked in a few dollars more so I got the gas version so some day we can do real MIG welding using the C25 shield gas mixture. Steve also went out and got a filled cannister of C25, and I've bought a spool of solid wire, so when the trusses are done I'll reverse the polarity, put in the solid-core wire, hook up the C25 regulator and then try cooking with gas. As it is, the flux core welding is going OK, though the welds are slaggy and definitely unpretty.
A while back I wrote about having the wing plugs delivered to a shop where we were going to do the wing molds. The guy at the shop offered me a very attractive shop rate and quoted me a very reasonable number of hours to do the staging work and make the mold support frame. Unfortunately, that deal has fallen through; that's why I'm making all these wing mold parts myself. It turns out that there is no way they could do the work specified in the number of hours quoted; in fact the guy denied ever quoting the number of hours that he did, saying he'd have to be on drugs to suggest such a low number (his words, not mine). And all through this, I received no written estimate or quote, even after they'd run the clock out on the original verbal estimate and achieved only the very basic staging work on one wing plug. Sensing a huge clusterfutz of "he said, he said" looming in the immediate future, I wrote a painful check that pulled the plug on the deal, and Doug and I retrieved the wing plugs and put them back away in my own shop.
In happier news, in addition to all this sailplane development stuff I've been getting in lots of fun activities with the family, in particular a couple of great trips into Yosemite for camping and rock climbing. On the weekend of 19 through 21 August we camped out in Crane Flat, and on the Saturday of that weekend my friend Jeff Hooker and I climbed the Royal Arches route, a 1930s 15-pitch classic that appears in Steck and Roper's list of 50 classic climbs in North America. That was kick-ass fun, having nothing to do all day long but climb and hang out; that one climb pretty much doubled my outdoor trad climbing experience, and tripled my multi-pitch experience. We divided the work pretty evenly; I think that each of us led about seven pitches; though Jeff led one or two more than me. I made Jeff lead all the hard stuff like the awkward chimney first pitch and the 5.7 fingers-in-piton-scars, and Jeff made me lead all the scary stuff like the A0 pendulum and subsequent thin traverse, and also the exposed bit where you step across a chute with nothing but 1200 feet of air between your feet and the roof of the Awahanee. It felt really good to be up on one of those big old routes that everybody knows and remembers, and where you still find pitons from the original nail'em-up guys. I learned a lot about gear handling, and about eyeing a pitch to figure out what to take and what to leave. In particular, I learned this the hard way on one pitch where I ended up plugging in every cam I had and using every sling, and punctuating the last runout to the anchor with a single chock clipped straight to the rope with the carabiner from my cleaning tool.
The only problem with the adventure wasn't with the climb but rather with the descent. It turned out that we were a bit too mellow getting to the top, and we didn't have enough time to rappel all the way to the ground before it was full-on dark. With our single 60-meter rope we were a bit slow on the abseil, and when we got to rap station 8 and couldn't see the next set of anchors we dug through our pack and discovered that we'd not packed a headlamp. Oh, bother. We ended up bivouacing there on the ledge at rap station 8, occupying a space about as big as the hood of my car. Jeff pulled in our rope and lounged on its coils, and I just curled up in the dirt under the manzanita bush there. About half an hour before dawn it was light enough to get back under way, and we finished the raps and were back in camp by 07:30.
We returned to Yosemite the weekend of 1 October for another fine three-day weekend of camping, this time with my sister-in-law and her son. That was also quite fun. I caught a ride to the park with a woman I met on an Internet rock climbing forum, and on Saturday I climbed with a Eric (last name unknown), a man that I'd corresponded with on the same forum. We started off with Munginella, a 3-pitch Yosemite Classic on which I got way off-route on the second pitch, and on which we took turns trading good-natured jibes with two other climbing parties. They had radios, and insisted on acknowledging calls with "10-4," so we started doing C.W. McCall imitations. Y'got a copy on me, c'mon? After Munginella, I led Claude's Delight, and then Eric and I took turns toproping the adjacent Lena's Lieback and called it a fine fine day. On Sunday we had a lazabout morning, broke camp, and then we did a bunch of easy climbing with the family on Swan Slab Gully. I had a really good time giving everybody an intro to rock climbing, and I also enjoyed answering questions for several non-climbing tourists who happened to encounter us while walking the trail at the base of the wall.
And in between those Yos trips I had a few nice adventures on the bicycle; a couple of times I biked 12 miles back from the shop after Brigitta dropped me off in the morning. Once I biked 20 miles in to our local climbing crag and then five miles out to rendesvous with Brigitta. And after returing from my annual project status update in Tehachapi, I dropped the rental car off at the Enterprise office above Sonora and biked all the way down to the swaybacked Parrott's Ferry bridge, again meeting Brigitta for the uphill leg home. The final stretch down to the bridge was pretty steep; over the last three miles I averaged almost 30 MPH.
Anyhow, here's the latest photos:
Me and the Royal Arches. We climbed to the small arch in the upper left of the photo, and then rappelled straight down the face.
And again, this time on our lunch break just beyond the A0 traverse. Those trees down on the valley floor sure look tiny.

Jeff Hooker at the same spot. Yes, that's half of Half Dome in the background.

The plug for the control stick platform. The arrow on face D points forward. The inclined surface on the right half will support the bottom of the roll bellcrank.
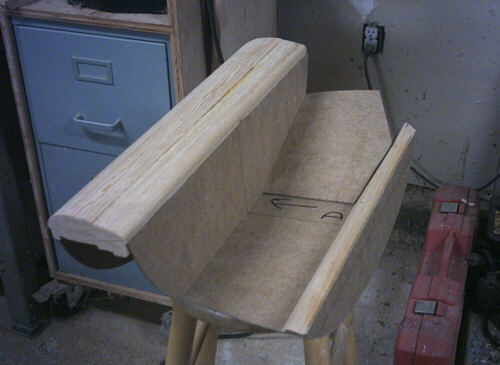
Looking forward at the stick platform plug. This part will make more sense when I fill in the gaps.

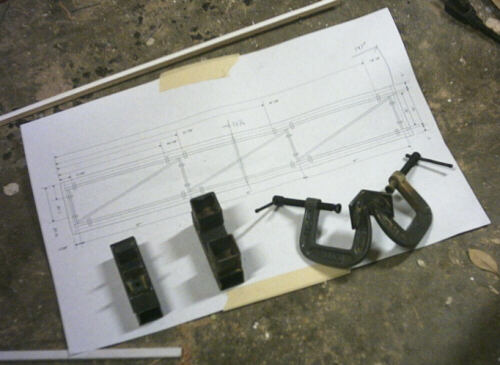
A collection of doodads for the wing mold support trusses. The things on the left are two of the cleats for the truss welding jig. The thing on the right is a corner clamp I made by welding two cheap C-clamps to a chunk of angle iron. The drawing under them is my guidance sketch for assembling the truss jig.
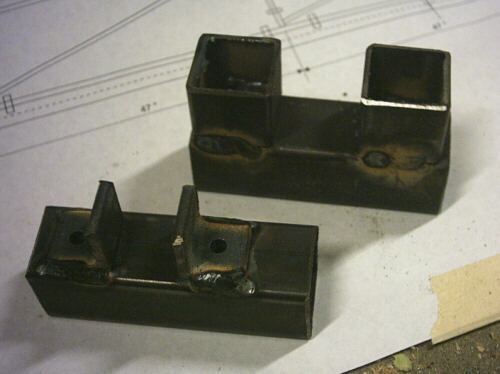
A closeup of the two cleats. The larger one is for the 1" tubing longerons, the smaller is for the 3/4" stanchions and diagonals. Yes, it is right poor welding, thanks for noticing. One of the objectives of weldng these parts up unstead of cutting them down is to get practice welding before starting on the trusses.
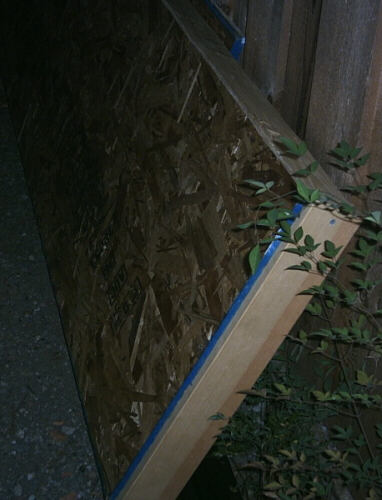
The 2-foot by 12-foot jig platform, stashed away in the side yard next to the fence.
Our fine little MIG welding machine.
Brad Hill's computer model of the winglet transition, which he used to develop the "braided slices" that I'm building the transion plugs out of.
![]()
This shot shows the "braiding" of the winglet transition where the horizontal slices interleave into the vertical slices.

A fuzzy shot of one of the winglet transitions curing in the simple fixture I made for joining the inboard and outboard sections at the braid.
page updated 12 October 2005 all text and graphics copyright (c) 2005 HP Aircraft, LLC